

For several centuries, walnut has been king of the gunstock woods for rifles and shotguns. The wood’s moderate density, strength and workability make it suitable for long arms as well as the two-piece stocks of shotguns and lever guns. The appealing color and grain variations of walnut can make some gunstocks akin to pieces of art…with some stock blanks these days fetching well in the $1000s. Beginning in Europe, however, some military arms manufacturers began using a more “Plain Jane” wood that had great durability, strength and availably. This wood is beech (genus Fagus, ssp.). The wood’s fairly straight grain and interlocking rays make for a dense hardwood which was even used in some military weapons (e.g. Mauser) over 100 years ago. I have seen some of these stocks that were made up of laminated layers of beech which would really increase the stability of the stock wood (and you thought laminated stocks were the new craze!)
Beech falls into a class generally referred to as “white woods”, which also includes maple and birch. Maple was the number one stock wood for American Longrifles from the 18th century forward…but that is really best saved for another discussion. Beech and birch see most of their commercial use as the base woods of furniture and such, usually buried under exotic veneers or paint. Birch (and birch plywood) is a major go to for a stable furniture wood. This stability (and lower cost) is what pulled beech and birch into the gunstock arena.
Each of these woods make excellent gunstocks. Maple can be drop dead gorgeous with its tiger-stripe curl on this flintlock stock blank. The trick is to finish properly to accentuate the curl, best done with 18th century ferric nitrite stains.
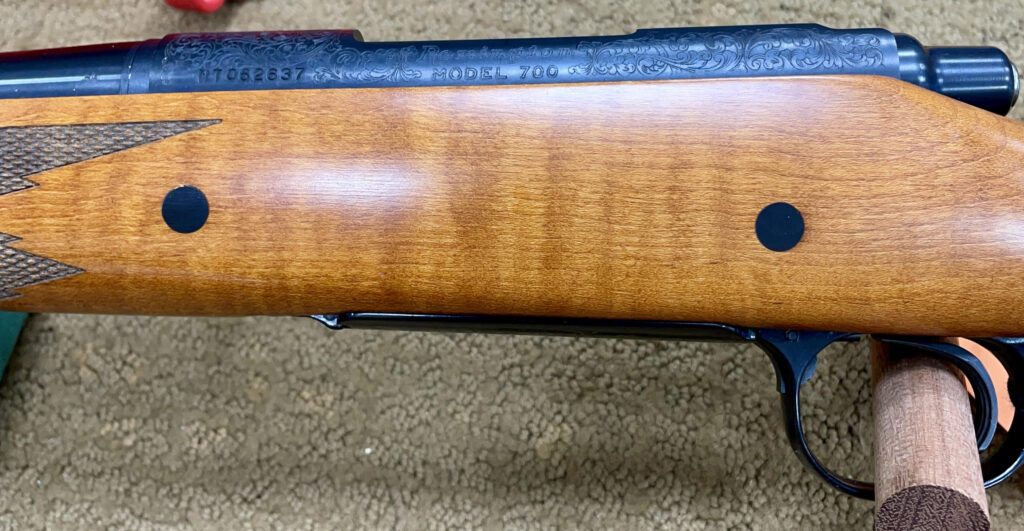
Occasionally, manufacturers offer maple as an upgrade as in this Remington Model 700.
But for the most part we rarely get excited about a beech or birch gunstock, primarily since manufacturers almost always hide it away under a dipped or sprayed gel stain finish to make it have somewhat of an appropriate “gunstock” color. Browning even made BPS shotguns stocked in beech that had a black textured armor coating.

Not to say that birch is an unattractive wood when correctly finished. I had a little .22 lever gun when I was a kid that was birch stocked and custom stocks like the one below for the Remington 700 from Old Arms of Idaho made from birch are not uncommon.

Why would gun manufacturers finish stocks in this manner? Beech is just not a wood that responds to typical wood stains or oil finishes very well. I have had several folks bring me rifles that they had attempted to refinish which they were not at all pleased with (Ummm…yup…that was me with my Marlin Glenfield Model 20 in 1975!) What happens is that the undulating grain, crossing rays and areas of open grain create highly irregular patterns and have different densities resulting in variable levels of absorption of typical oil and water-based stains resulting in a blotchy unappealing appearance. Wood stains typically have suspended pigments in the mix, especially in darker tones such as walnut and mahogany. These pigments can quickly fill and darken areas of porous open grain, such as the sweep of the pistol grip or nose of the stock comb. That’s why manufacturers such as Marlin, Remington, Savage, etc., used a spray and/or dip method to seal the surface and then used evenly tinted topcoats on the surfaces of their “economy grade” guns. And this is also why you are left with a bright white scratch or pockmarks when these stocks get damaged.as you can see in the forestock pictured previously.
There are a few approaches that can be used to refinish these types of stocks…but it all depends on what the customer is wanting. To return it close to the original finish, the stock should be degreased well, resealed with a crystal-clear shellac or lacquer, and then top-coated with a closely matched gel stain or glaze. This is often a good option when extensive repairs to the stock wood were needed and glue lines and fill in woods would be extremely obvious (I have seen manufacturers do this on a few firearms!). Typically, however, the guns that come in are fully or partially stripped and stained or more commonly the owner wants “a stock that looks like real wood”. In these cases, I use a more surgical approach to the refinishing which is depicted in the page header.
The first step is to get back to a clean canvas. Original (or attempted) finishes are removed down to bare wood. Any water or oil damage is addressed, as are the nicks, scratches, dents and any major repairs. I keep a supply around of deceased beech gunstocks and beech lumber to pull pieces from, so that any grain and surface conditions can be as closely matched as possible in the repair. One thing to note: many import guns from Turkey and Italy have European Beech stocks, which has a pleasant salmon undertone to the wood compared to the pale creamy color with some light browns seen in American Beech.
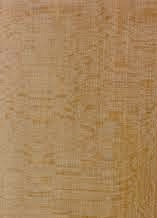
Beech is a hard wood and can be made very smooth through sanding or if you know how, scrapers work extremely well. Raising the grain with a dampened cloth will reveal any problem areas. Flat grain areas will be very smooth with the water almost sheeting on it, cross grain areas will look darker even with water and become rough, and medullary rays, which run perpendicular to the grain of the wood will often show up as shiny bright dots or ribbons as in the picture to the left. Making note of these physical characteristics when you are dampening the wood gives you a roadmap for how to address coloring the stock. Once you have the overall feel for the tone of the wood when wetted (similar to what the first application of an oil finish would look like) you can address evening the color of the stock to attempt to make it more harmonious and pleasant to the eye.
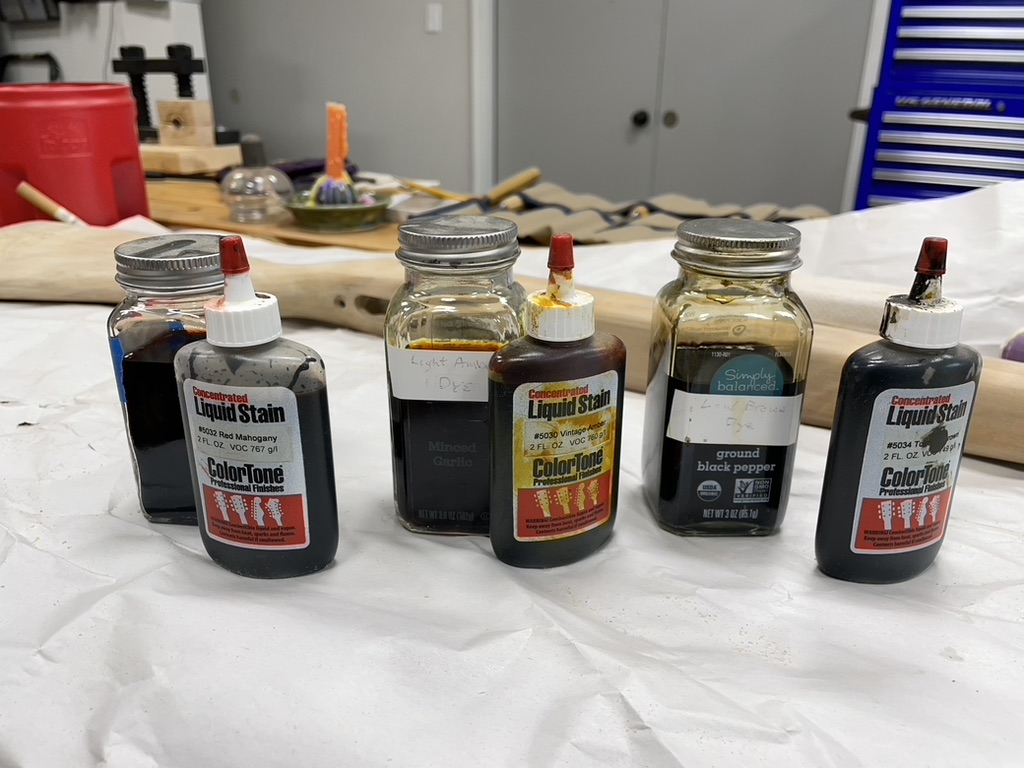
My approach to evening out the stock is through the application of alcohol-based wood dyes, commonly used by custom musical instrument artisans. These dyes are concentrated, so you can tailor make your dilutions to achieve the effect you want, where you want. Everclear or denatured ethanol work well as solvents as they penetrate and dry quickly and do not raise the grain of the wood. I typically go with a fairly dilute solution and build up the tones in multiple applications, usually beginning with amber tones, then mahogany reds and balancing the piece with various browns in selected regions to tie the stock together.
Using multiple applications also allows the colors to penetrate into the wood (unlike stains and gels that sit on the surface), so future scratches won’t appear like whitewood as would be the case with the original topcoat gel. On a test piece I did a while back, the dyes penetrated the stock wood (beech) about almost 0.2 inches in some areas of the piece. This approach also works well on standard grade walnut stocks where streaks of light sapwood need to be darkened/colored. but don’t get too carried away. On two piece stocks try to get color tones balanced between the pieces or the completed firearm will look weird!

This approach is also useful when blending in repair work with the remainder of the stock and disguising rust/water stains. Rusty buttplate screws given sufficient time and moisture will react with the tannins present in the wood resulting in a permanent darkening, as seen here, that cannot even be bleached out completely with oxalic acid. Gradual blending helped the discoloration disappear into the overall color of the stock. The bright ray wood made this one a challenge, but its echo faded away and added interest to the stock.
To finish up, apply your favorite oil finish. On finer woods I use TruOil or an 18th Century boiled linseed oil finish I got from Eric Kettenburg about 20 years ago. For guns with beech stocks, I typically use Chem Pak Hunter Satin Oil finish from Brownells. It is easy to apply and gives a nice hard luster to the stock. I usually go over the stock with about four applications of oil and then wet sand areas where the cross grain needs filling. Once the wood is fully filled, a few more coats of oil followed with a light application of Renaissance Wax and the job is done.
Well, hope you found this interesting or helpful and the folks who have been asking me about this got what they wanted! Feel free to comment here in the blog or shoot me an email (john@jvpgunsmith.com) if you have any questions.